11. Java Network
Last updated -
2024년 11월 21일
Edit Source
# 네트워크 프로그래밍
# 기초 용어
IP 주소와 Port
- IP : 컴퓨터를 구분하는 주소
- Port : 컴퓨터 안에 있는 서버들을 구분하는 값
- FTP서버, 웹서버 등 다양한 서버들이 컴퓨터에 실행될 수 있으니까
| 구분 | 범위 | 설명 |
|---|
| Well Known Port 번호 | 0 ~ 1023 | 국제 인터넷 주소 관리 기구 (ICANN)에서 미리 예약해둔 포트 |
| Registered Port 번호 | 1024 ~ 49151 | 개인 또는 회사에서 사용하는 포트 |
| Dynamic 또는 Private Port 번호 | 49152 ~ 65535 | OS가 부여하는 동적 포트, 개인적인 목적으로 사용할 수 있는 포트 |
127.0.0.1
도메인(Domain) 주소
https://www.naver.com에서 www.naver.com은 도메인 주소이다.
도메인 네임 서버 (DNS, Domain Name Server)
- 도메인 주소를 IP로 변환한다.
nslookup 도메인주소- 이 명령으로 도메인에 해당하는 IP 주소를 알아낼 수 있음
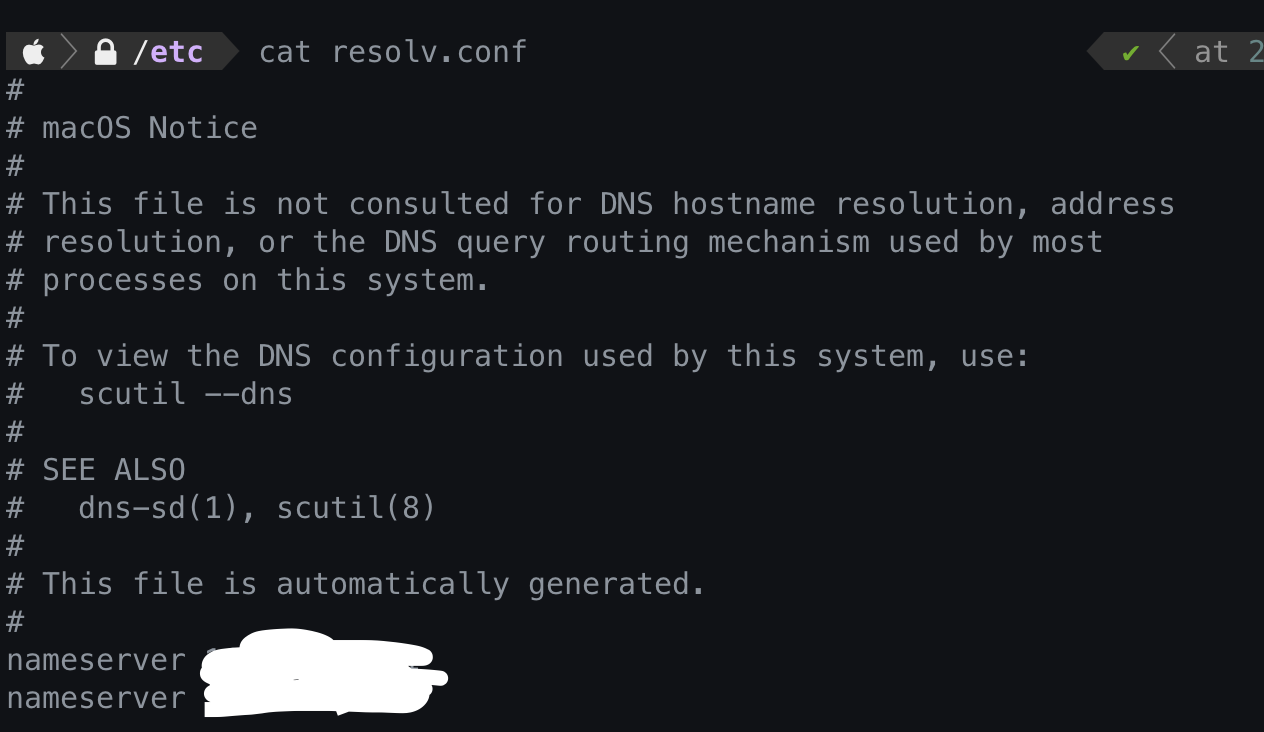
Mac, Linux에서 DNS 설정
/etc/resolv.conf 파일에서 설정- 보통 nameserver는 2개를 사용하는데, 하나가 죽었을 때 다른 것을 사용하기 위함
localhost
# Java 네트워크
IP 주소 알아내기 : InetAddress로 알아냄
1
2
| InetAddress ia = InetAddress.getLocalHost();
System.out.println(ia.getHostAddress());
|
- google의 IP 주소 알아내기
- 하나의 도메인은 여러 개의 IP 주소와 매핑될 수 있으니까 배열로 받았음
1
2
3
4
| InetAddress[] iaArr = InetAddress.getAllByName("www.google.com");
for (InetAddress ia : iaArr) {
System.out.println(ia.getHostAddress());
}
|
 1
 2
 3
 4
 5
 6
 7
 8
 9
10
11
12
13
14
15
16
17
18
19
20
21
22
23
24
25
26
| import java.net.InetAddress;
import java.net.UnknownHostException;
public class IpAddressExam {
public static void main(String[] args) {
try {
InetAddress ia = InetAddress.getLocalHost(); // 내 컴퓨터의 IP 정보를 구함
System.out.println(ia.getHostAddress());
} catch (UnknownHostException ue) {
ue.printStackTrace();
}
try {
InetAddress[] iaArray = InetAddress.getAllByName("www.google.com");
for (InetAddress ia : iaArray) {
System.out.println(ia.getHostAddress());
}
} catch (UnknownHostException ue) {
ue.printStackTrace();
}
}
}
// 127.0.0.1
// 142.250.206.228
// 2404:6800:400a:805:0:0:0:2004
|
# 클라이언트-서버
Client & Server 프로그래밍
- Socket : Server에 접속하는 역할
- ServerSocket : Client의 접속 요청을 기다리는 역할
- Client 요청을 기다리다가 접속하면 Socket을 반환
- Socket과 Socket 간에는 IO 객체를 이용하여 통신할 수 있다.
사용자가 웹 브라우저에 www.naver.com을 입력하면
- 접속
- 클라이언트가 서버에게 요청 정보 보냄
- 서버가 클라이언트에게 응답 정보 보냄
- 접속 close
이러한 방식으로 통신하겠다고 약속했다. 이것을 HTTP 프로토콜(규약)이라고 한다.
Java에서 Socket으로 통신하는 방법
- Port를 가지는 ServerSocket 인스턴스를 서버에서 생성
accept() 메서드를 사용해서 클라이언트를 기다림- 이렇게 기다리는 메서드를 blocking 메서드라고 함
- IP와 Port를 가지는 Socket 인스턴스를 클라이언트에서 생성
- 클라이언트가 생성한 Socket 인스턴스로 서버의 ServerSocket에 접속
accept() 메서드가 return 값으로 Socket을 반환- 서버에서 반환된 Socket과 클라이언트의 Socket이 연결된 상태
- IO 객체를 이용하여 통신할 수 있으니 InputStream, OutputStream 등 이용 가능
동시에 읽고 쓰려면 어떻게 해야할까? 앞에서 생각한 Thread를 생각하기 !
# 예제 실습
 1
 2
 3
 4
 5
 6
 7
 8
 9
10
11
12
13
14
15
16
17
18
19
20
21
22
23
24
| import java.net.ServerSocket;
import java.net.Socket;
public class VerySimpleWebServer {
public static void main(String[] args) throws Exception {
// 9090 포트로 대기
ServerSocket ss = new ServerSocket(9090);
// 클라이언트를 대기
// 클라이언트가 접속하는 순간, 클라이언트와 통신할 수 있는 socket을 반환
System.out.println("클라이언트 접속 대기중 ...");
Socket socket = ss.accept();
// 웹 브라우저(클라이언트)에서 http://127.0.0.1:9090에 접속하는 순간 출력됨
System.out.println(socket.toString());
ss.close();
System.out.println("서버가 종료됩니다 ...");
}
}
// 클라이언트 접속 대기중 ...
// Socket[addr=/127.0.0.1,port=51531,localport=9090]
// 서버가 종료됩니다 ...
|
 1
 2
 3
 4
 5
 6
 7
 8
 9
10
11
12
13
14
15
16
17
18
19
20
21
22
23
24
25
26
27
| import java.net.ServerSocket;
import java.net.Socket;
public class VerySimpleWebServer {
public static void main(String[] args) throws Exception {
ServerSocket ss = new ServerSocket(9090);
System.out.println("클라이언트 접속 대기중 ...");
Socket socket = ss.accept();
// Client와 읽고 쓸 수 있는 InputStream, OutputStream 반환됨
OutputStream out = socket.getOutputStream();
InputStream in = socket.getInputStream();
// HTTP 프로토콜은 클라이언트가 정보를 서버에게 보내준다. (요청 정보)
byte[] buffer = new byte[512];
int readCount = 0;
while ((readCount = in.read(buffer)) != -1) {
System.out.write(buffer, 0, readCount);
}
System.out.println(socket.toString());
ss.close();
System.out.println("서버가 종료됩니다 ...");
}
}
|
 1
 2
 3
 4
 5
 6
 7
 8
 9
10
11
12
13
14
15
16
17
18
19
| 클라이언트 접속 대기중 ...
GET / HTTP/1.1
Host: 127.0.0.1:9090
Connection: keep-alive
sec-ch-ua: "Google Chrome";v="111", "Not(A:Brand";v="8", "Chromium";v="111"
sec-ch-ua-mobile: ?0
sec-ch-ua-platform: "macOS"
Upgrade-Insecure-Requests: 1
User-Agent: Mozilla/5.0 (Macintosh; Intel Mac OS X 10_15_7) AppleWebKit/537.36 (KHTML, like Gecko) Chrome/111.0.0.0 Safari/537.36
Accept: text/html,application/xhtml+xml,application/xml;q=0.9,image/avif,image/webp,image/apng,*/*;q=0.8,application/signed-exchange;v=b3;q=0.7
Sec-Fetch-Site: none
Sec-Fetch-Mode: navigate
Sec-Fetch-User: ?1
Sec-Fetch-Dest: document
Accept-Encoding: gzip, deflate, br
Accept-Language: ko-KR,ko;q=0.9,en-US;q=0.8,en;q=0.7
Socket[addr=/127.0.0.1,port=51560,localport=9090]
서버가 종료됩니다 ...
|
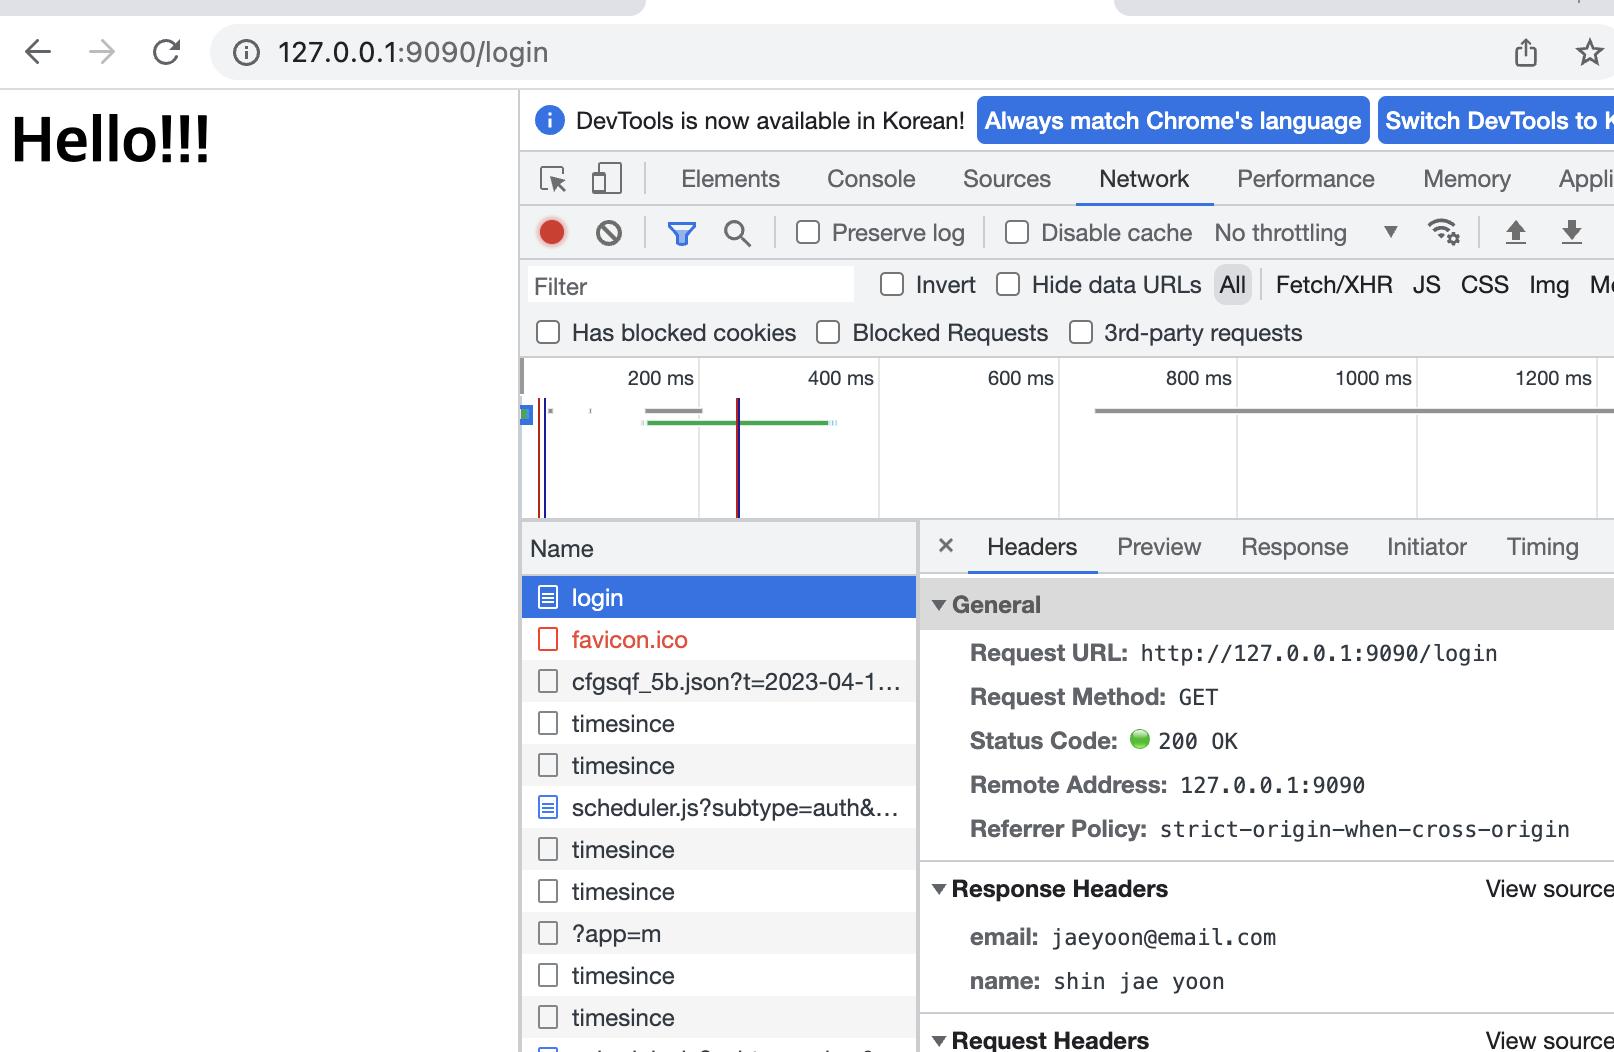
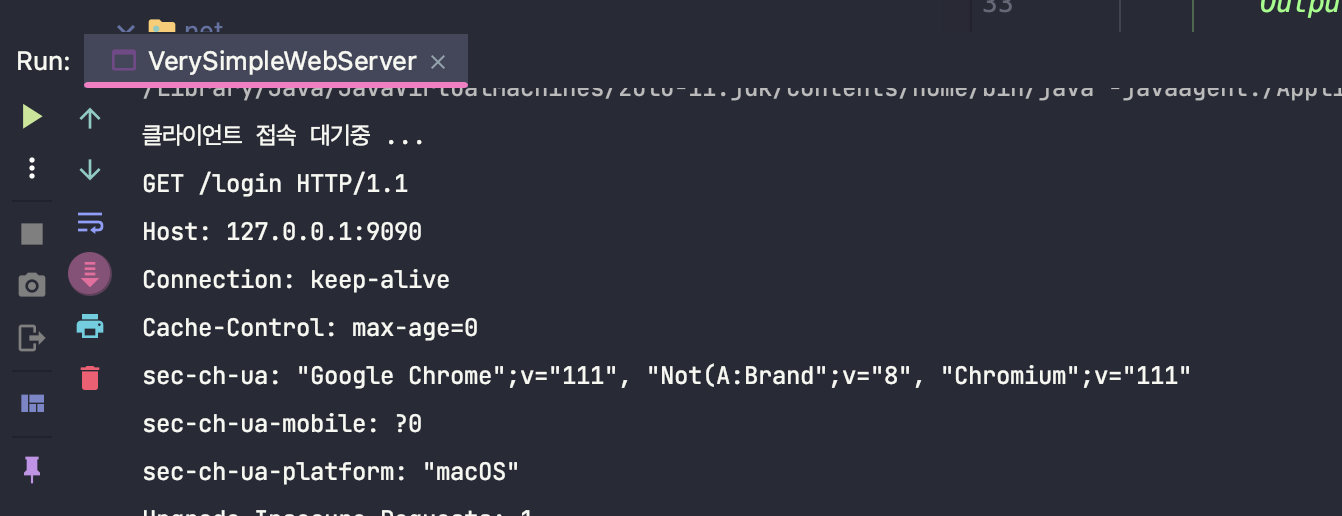
- GET 요청 확인 가능 (
/)로 들어왔네 - Host ~ 빈 줄 전까지는 브라우저가 보내주는 헤더 정보
- 어떤 요청 방식인지 + 요청 보내는 쪽 정보
 1
 2
 3
 4
 5
 6
 7
 8
 9
10
11
12
13
14
15
16
17
18
19
20
21
22
23
24
25
26
27
28
29
30
31
32
33
34
35
36
37
38
39
40
41
| public class VerySimpleWebServer {
public static void main(String[] args) throws Exception {
ServerSocket ss = new ServerSocket(9090);
System.out.println("클라이언트 접속 대기중 ...");
Socket socket = ss.accept();
InputStream in = socket.getInputStream();
BufferedReader br = new BufferedReader(new InputStreamReader(in));
String firstLine = br.readLine();
List<String> headers = new ArrayList<>();
String line = null;
// 빈 줄을 만나면 while문 종료
while (!(line = br.readLine()).equals("")) {
headers.add(line);
}
System.out.println(firstLine);
for (int i = 0; i < headers.size(); i++) {
System.out.println(headers.get(i));
}
// 서버가 클라이언트에게 응답메시지 보내기
OutputStream out = socket.getOutputStream();
PrintWriter pw = new PrintWriter(new OutputStreamWriter(out));
pw.println("HTTP/1.1 200 OK");
pw.println("name : shin jae yoon");
pw.println("email : jaeyoon@email.com");
pw.println();
pw.println("<html>");
pw.println("<h1>Hello!!!</h1>");
pw.println("</html>");
pw.close();
System.out.println(socket.toString());
ss.close();
System.out.println("서버가 종료됩니다 ...");
}
}
|
# 웹서버 동작
- 위에서는 요청-응답 한 번 씩만 하고 종료되었다. 이것을 유지되도록 하면 어떻게 해야할까?
while (true)로 무한 루프 돌려야겠지. 그래야 요청-응답, 요청-응답 하니까!- 그런데, 하나의 과정이 끝나기 이전에 다른 요청이 들어오면 어떻게 처리할거임?
 1
 2
 3
 4
 5
 6
 7
 8
 9
10
11
12
13
14
15
16
17
18
19
20
21
22
23
24
25
26
27
28
29
30
31
32
33
34
35
36
37
38
39
40
41
42
43
44
45
46
47
48
49
50
51
52
53
54
55
56
57
58
59
60
61
62
63
64
65
66
67
68
69
70
71
72
73
74
75
76
77
78
| package com.example.net.webserver;
import java.io.*;
import java.net.ServerSocket;
import java.net.Socket;
public class WebServer {
public static void main(String[] args) throws Exception {
// 클라이언트가 접속할 때까지 대기
ServerSocket serverSocket = new ServerSocket(10000);
// 클라이언트가 접속하면 클라이언트와 통신하는 clientSocket 반환
System.out.println("1 - 클라이언트 접속 대기");
try {
while (true) {
Socket clientSocket = serverSocket.accept();
ClientThread ct = new ClientThread(clientSocket);
ct.start();
}
} finally {
serverSocket.close();
}
}
}
class ClientThread extends Thread {
private Socket clientSocket;
public ClientThread(Socket clientSocket) {
this.clientSocket = clientSocket;
}
public void run() {
try {
InputStream inputStream = clientSocket.getInputStream();
BufferedReader br = new BufferedReader(new InputStreamReader(inputStream));
OutputStream out = clientSocket.getOutputStream();
PrintWriter pw = new PrintWriter(new OutputStreamWriter(out));
System.out.println("2 - 클라이언트 접속 성공");
String firstLine = br.readLine();
String msg = "";
if (firstLine.indexOf("/hello") >= 0) {
msg = "hello";
}
else if (firstLine.indexOf("/hi") >= 0) {
msg = "hi";
}
System.out.println(firstLine);
String line = null;
while (!(line = br.readLine()).equals("")) {
System.out.println(line);
}
System.out.println("3 - 응답한다.");
pw.println("HTTP/1.1 200 OK");
pw.println("name : shin jae yoon");
pw.println("email : jaeyoon@email.com");
pw.println();
pw.println("<html>");
pw.println(firstLine + "!!!");
pw.println("</html>");
pw.flush();
br.close();
pw.close();
clientSocket.close();
} catch (Exception e) {
e.printStackTrace();
}
}
}
|
# 채팅 프로그램 예제
# 구현 스케치
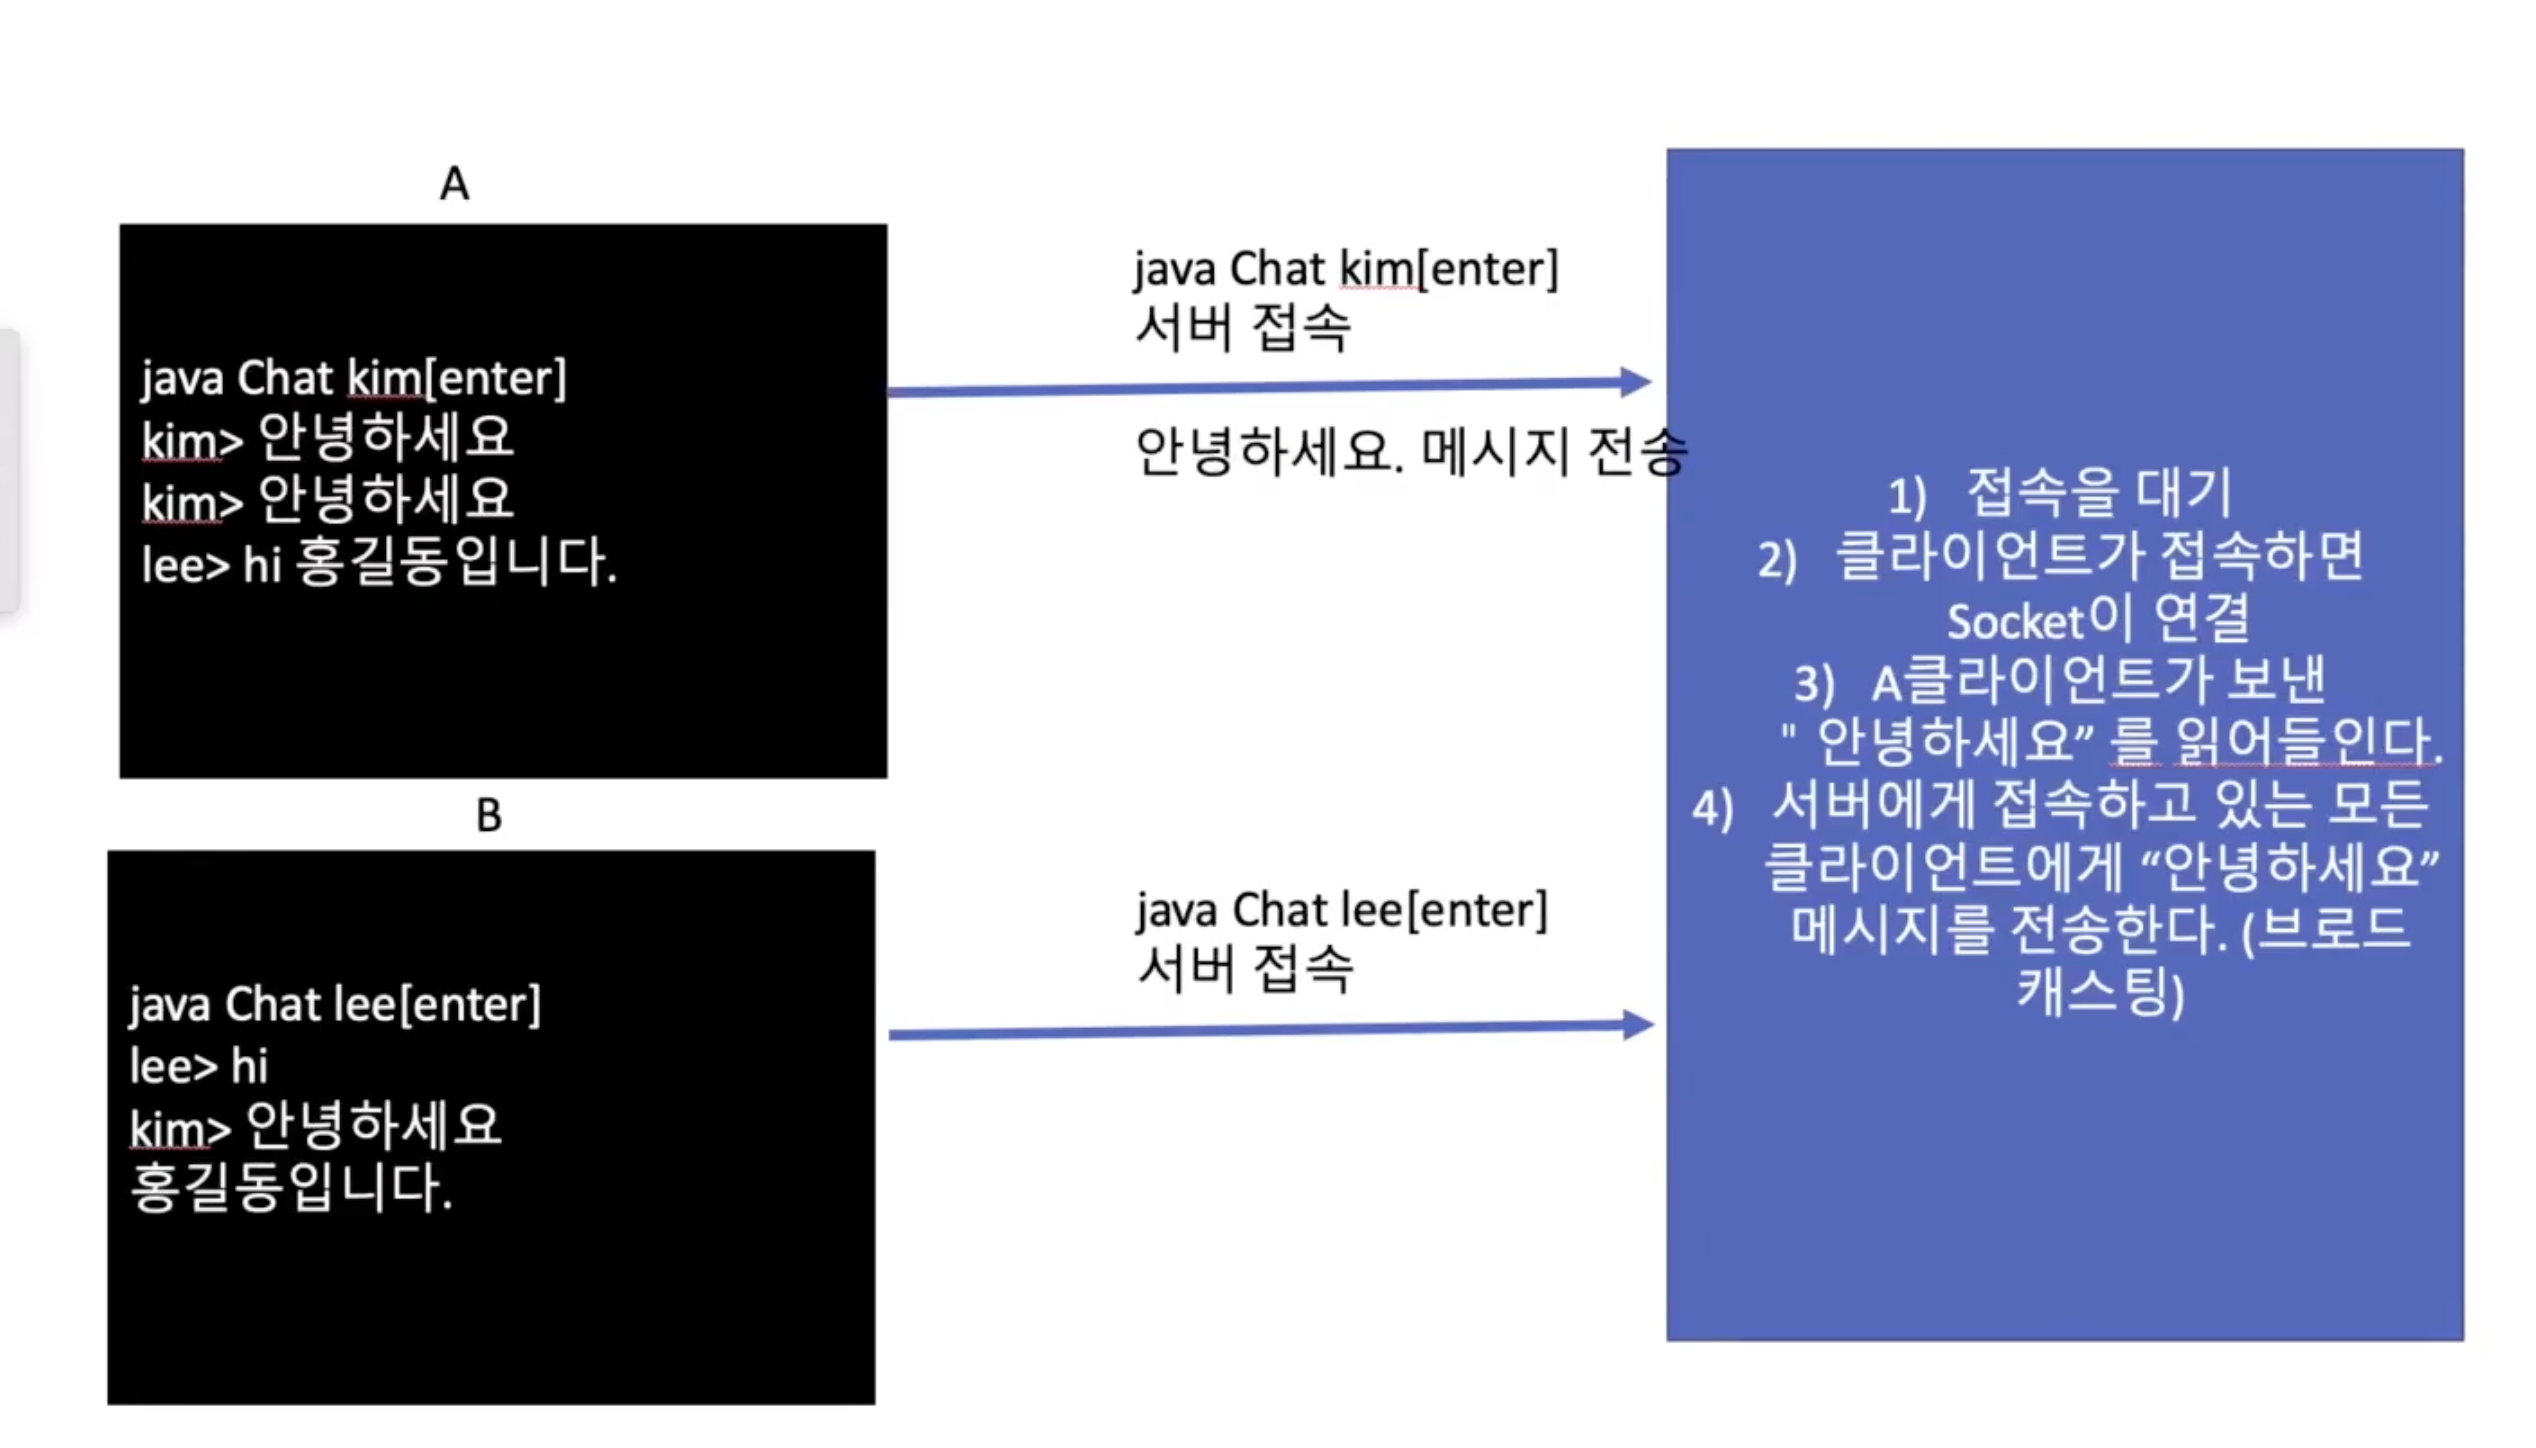
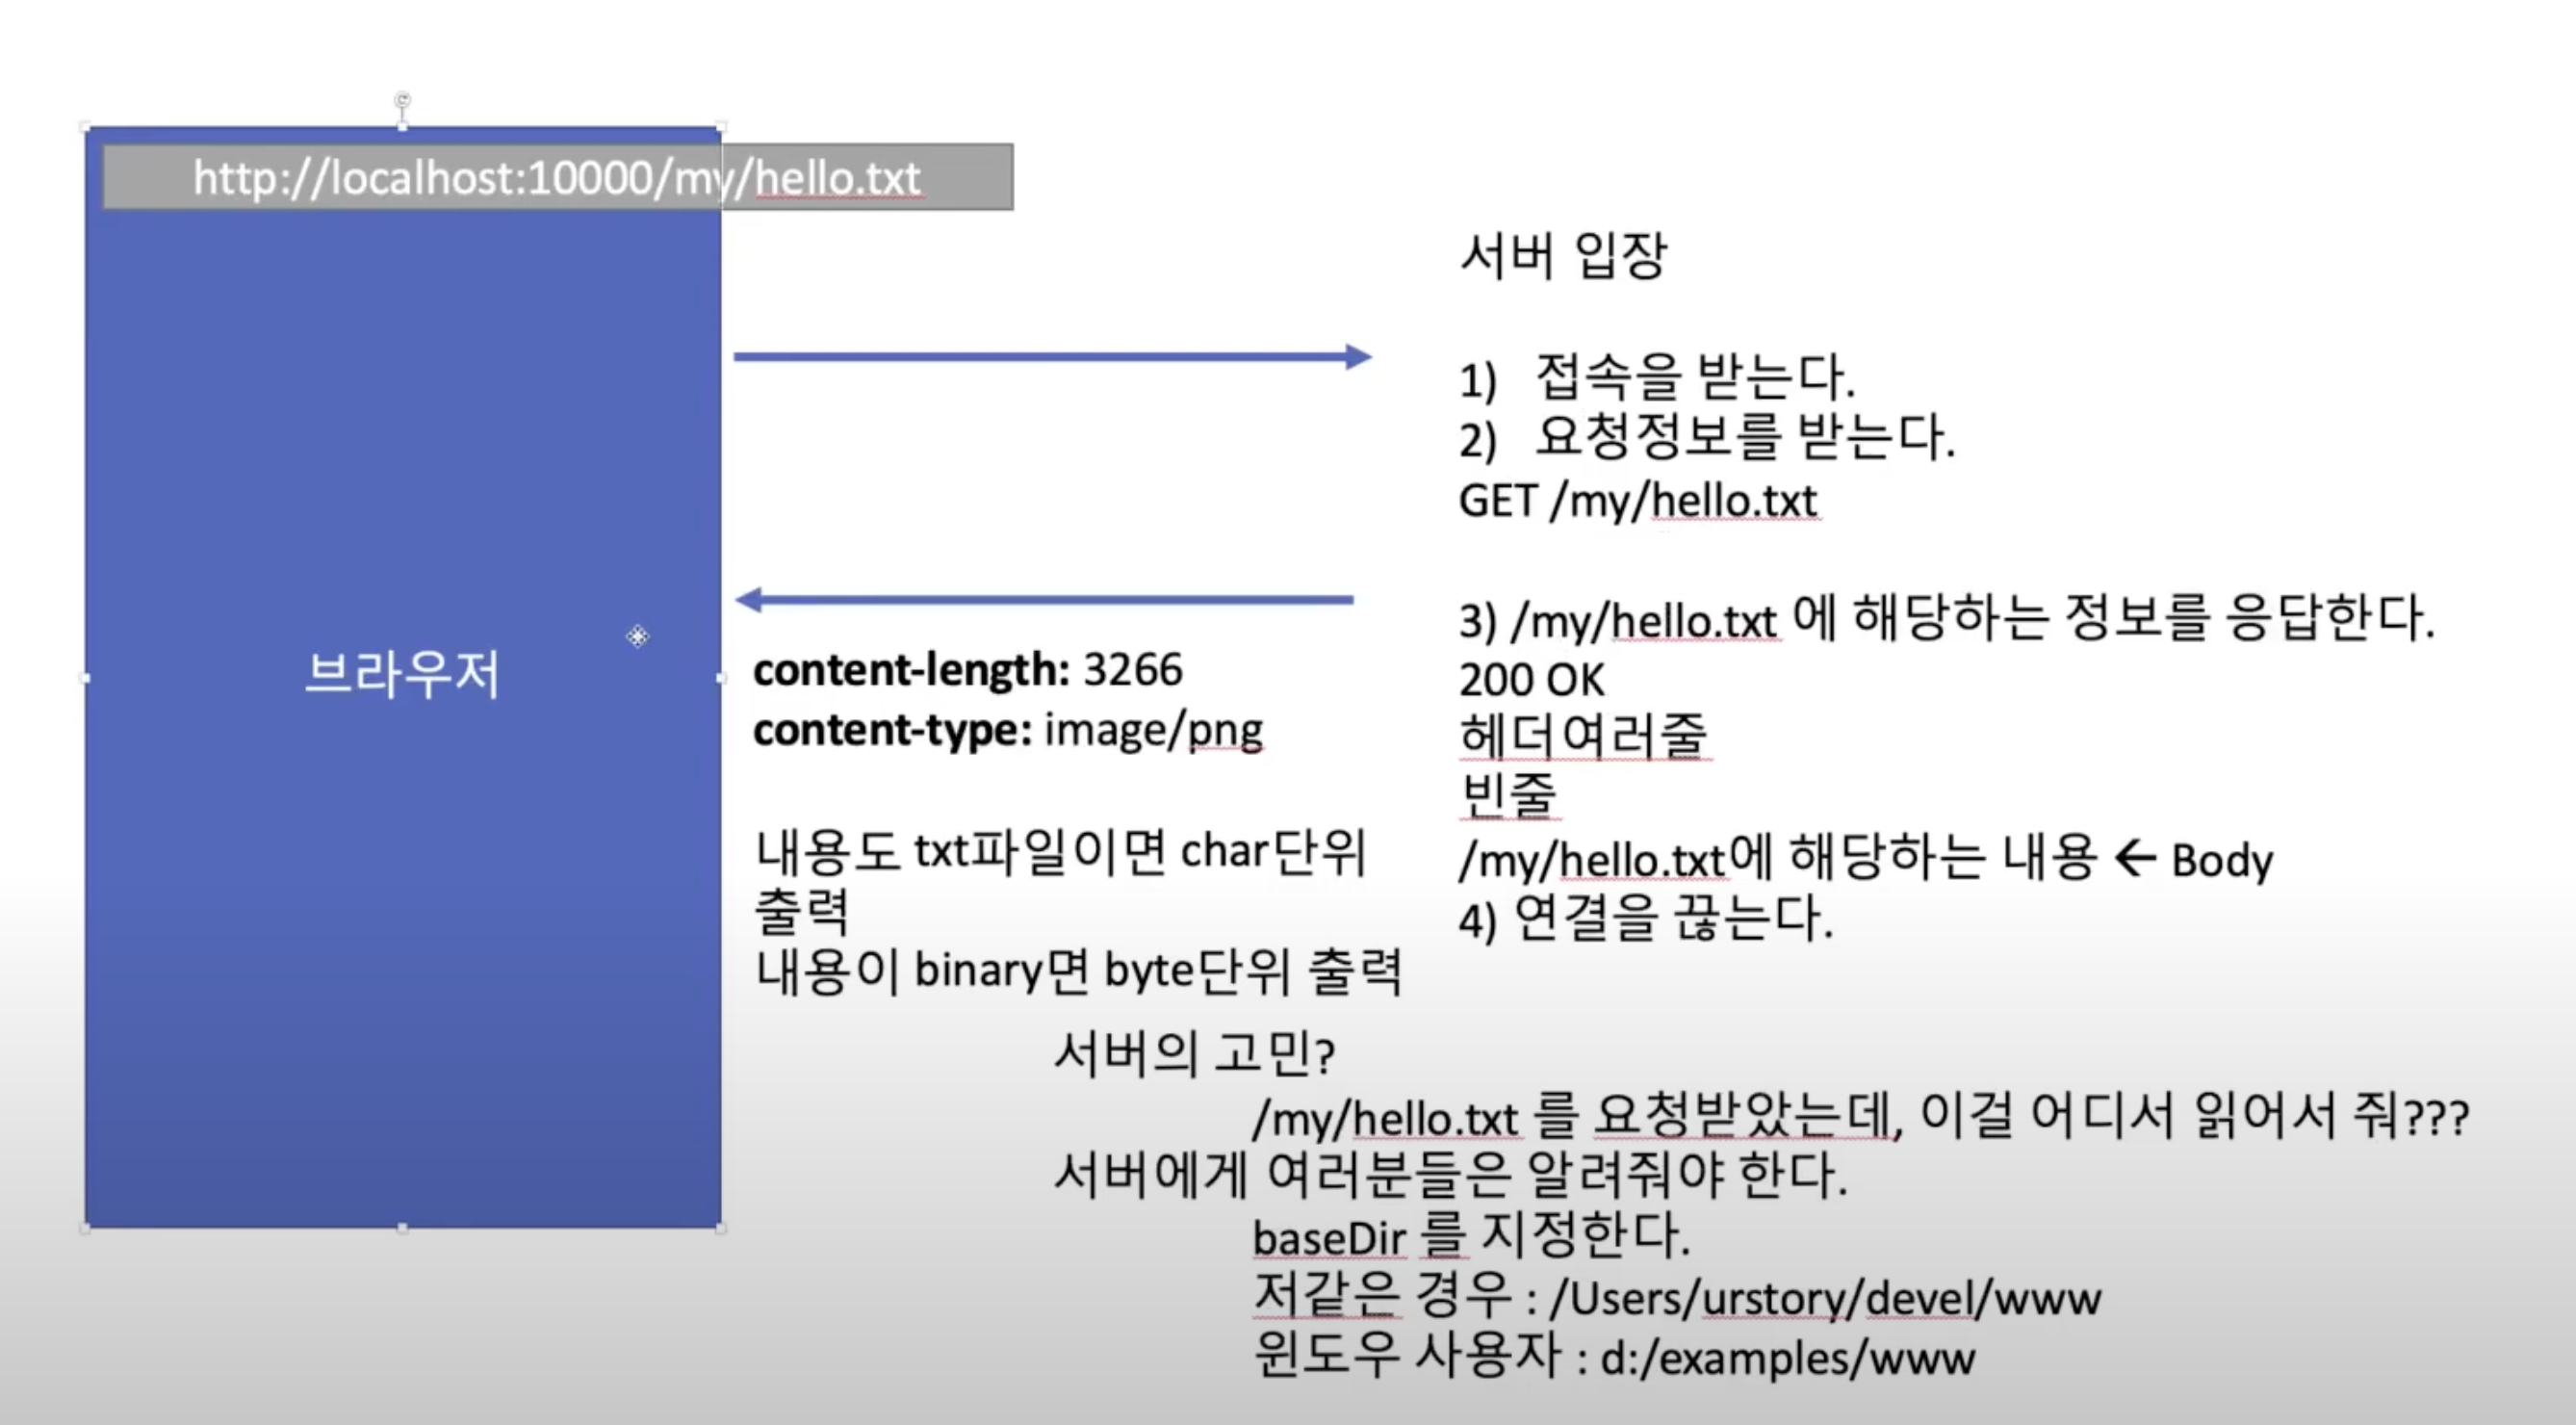
- 채팅은 클라이언트가 메시지를 보내면, 서버가 연결된 모든 클라이언트에게 메시지를 보내야 한다.
- 클라이언트가 접속할 때마다 서버는 스레드를 생성한다.
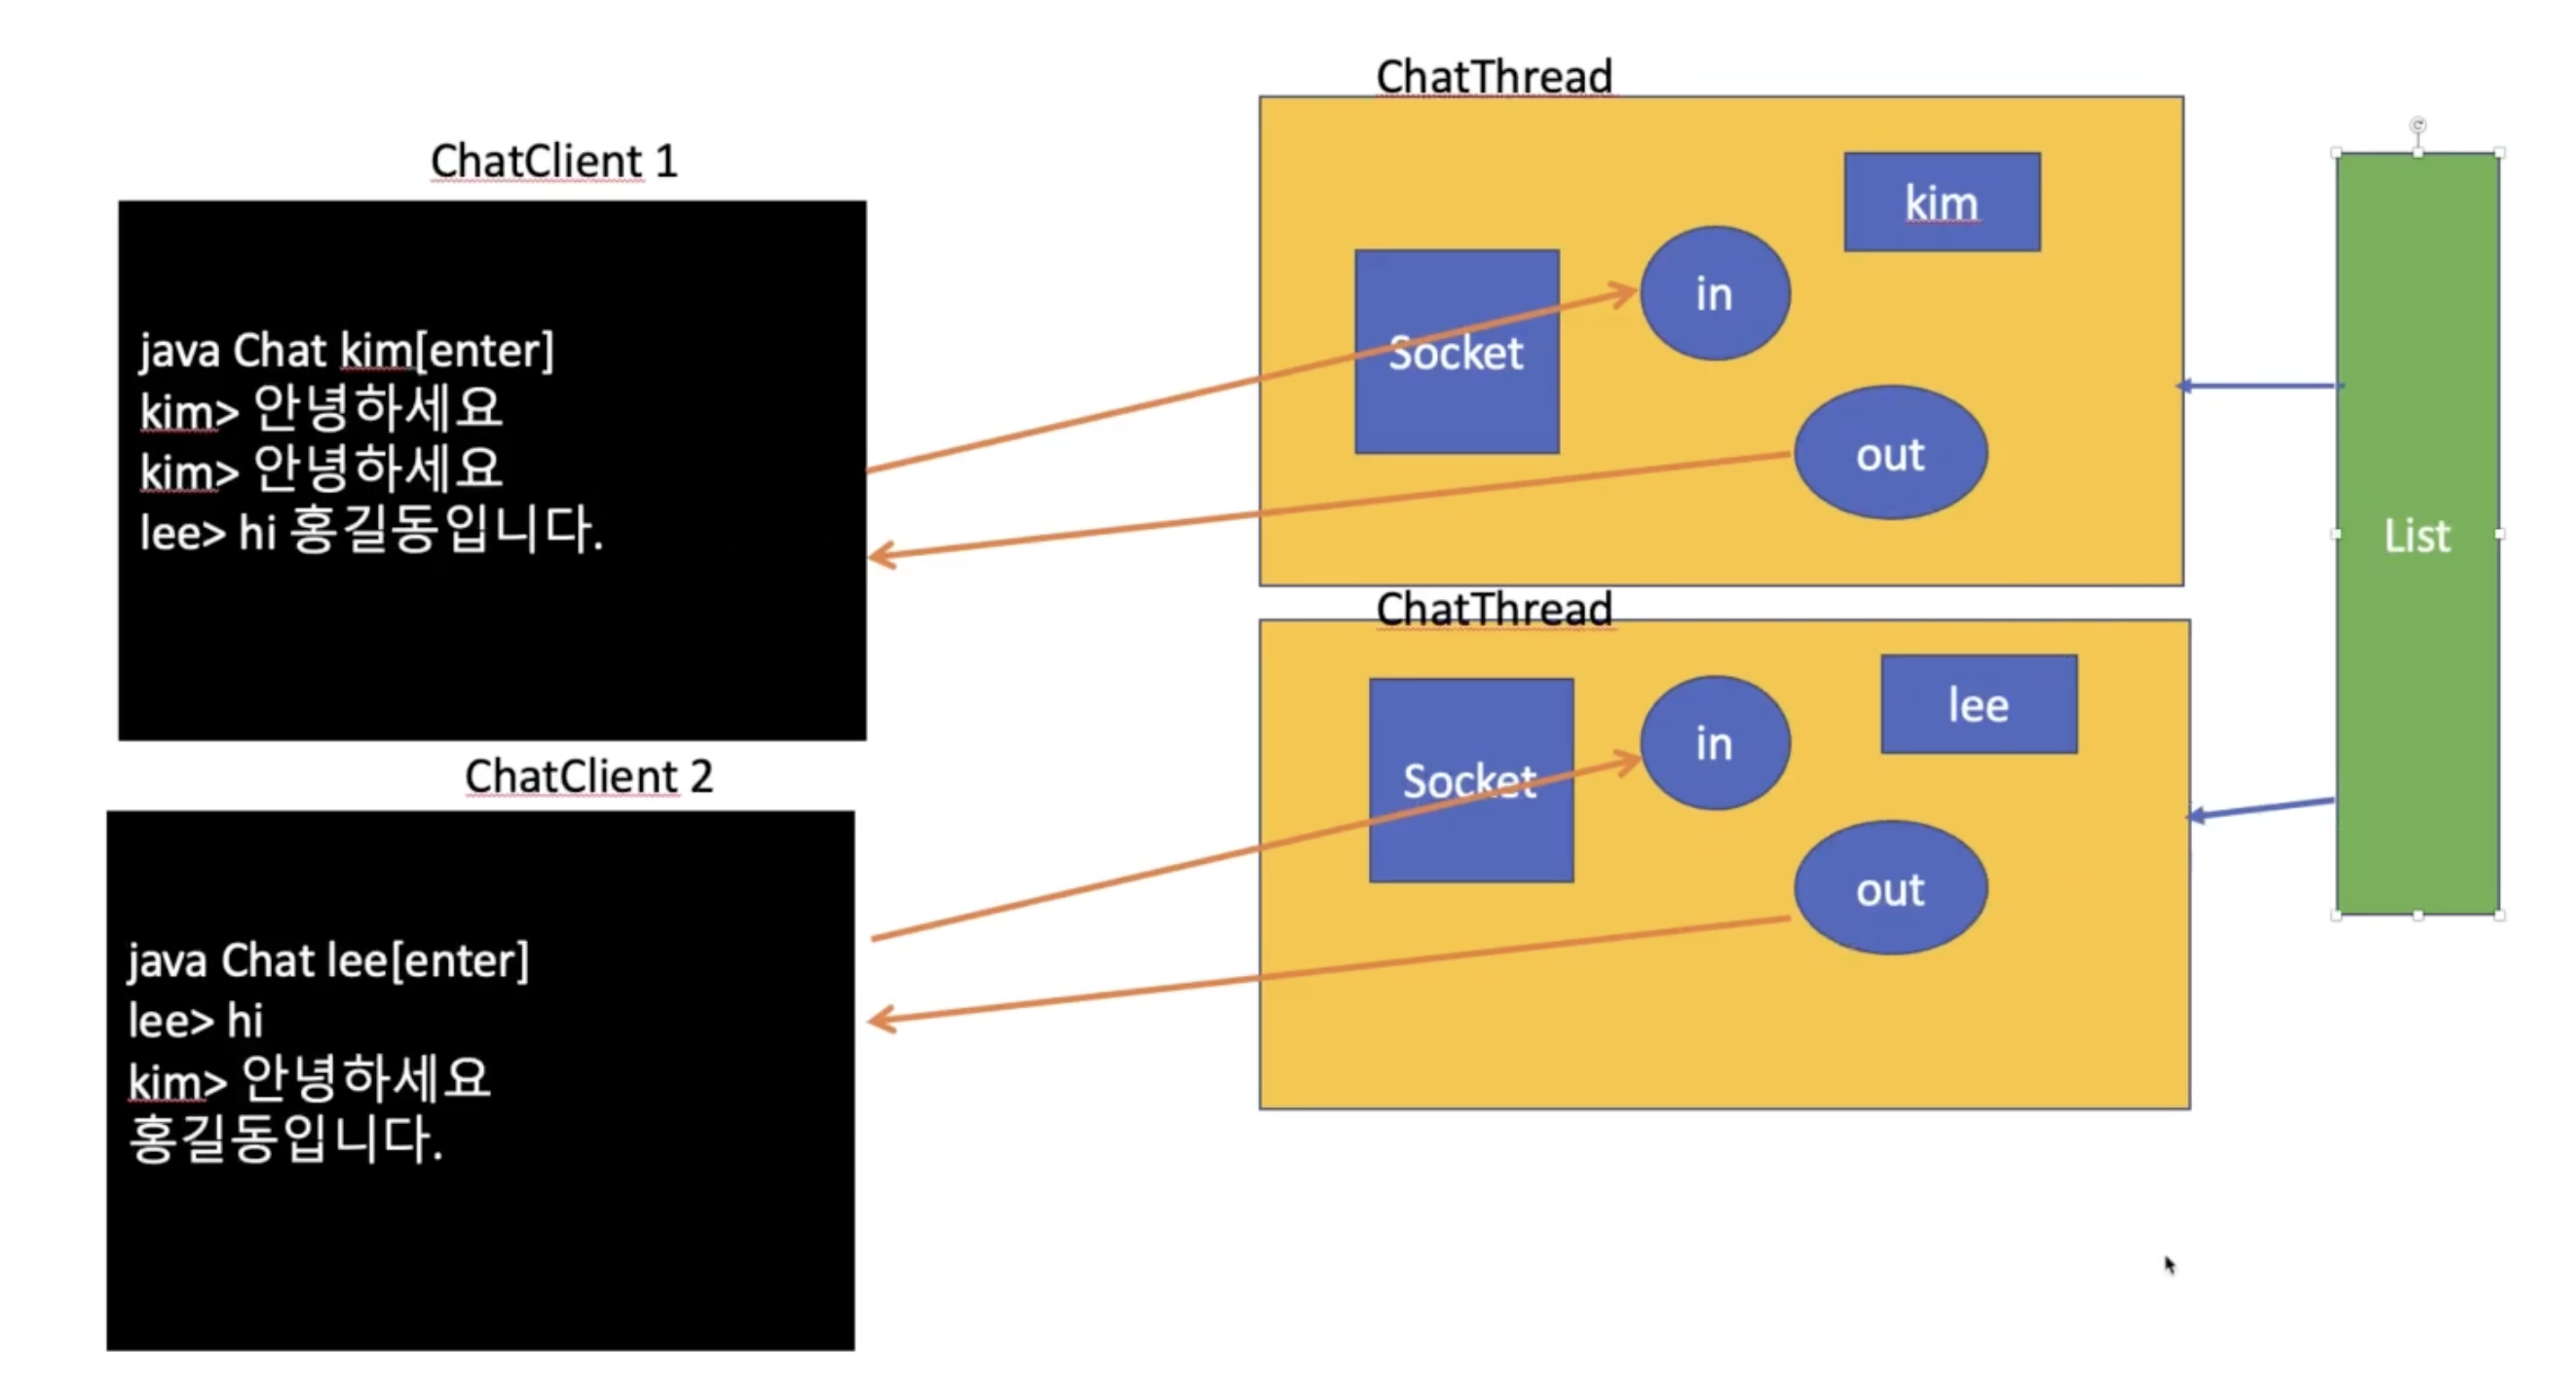
- 서버의 스레드마다 소켓을 가지고 스레드 각각은 클라이언트와 연결
- 이때, 서버가 연결된 모든 클라이언트에게 메시지를 보내기 위해 공유 객체도 사용
- 공유 객체에서 스레드에 안전한 리스트를 생성
- 스레드 객체가 생성될 때마다 while 문 밖의 outList를 생성자로 하나씩 넣어줌
- 스레드가 10개 생성되면, outList라는 하나의 객체를 공유!!
List<PrintWriter> outList = Collections.synchronizedList(new ArrayList<>());- Collections.synchronizedList()
# 실습 코드 - 서버
 1
 2
 3
 4
 5
 6
 7
 8
 9
10
11
12
13
14
15
16
| public class ChatServer {
public static void main(String[] args) throws Exception {
ServerSocket serverSocket = new ServerSocket(8888);
// 공유 객체에서 스레드에 안전한 리스트를 생성
// 스레드 객체가 생성될 때마다 while 문 밖의 outList를 생성자로 하나씩 넣어줌
// 스레드가 10개 생성되면, outList라는 하나의 객체를 공유!!
List<ChatThread> list = Collections.synchronizedList(new ArrayList<>());
while (true) {
Socket socket = serverSocket.accept();
ChatThread chatClient = new ChatThread(socket, list);
chatClient.start();
}
}
}
|
 1
 2
 3
 4
 5
 6
 7
 8
 9
10
11
12
13
14
15
16
17
18
19
20
21
22
23
24
25
26
27
28
29
30
31
32
33
34
35
36
37
38
39
40
41
42
43
44
45
46
47
48
49
50
51
52
53
54
55
56
57
58
59
60
61
62
63
64
65
66
67
68
69
70
71
72
73
74
75
76
77
78
79
80
81
82
83
84
85
86
87
88
| public class ChatThread extends Thread {
private String name;
private BufferedReader br;
private PrintWriter pw;
private Socket socket;
List<ChatThread> list;
public ChatThread(Socket socket, List<ChatThread> list) throws Exception {
this.socket = socket;
BufferedReader br = new BufferedReader(new InputStreamReader(socket.getInputStream()));
PrintWriter pw = new PrintWriter(new OutputStreamWriter(socket.getOutputStream()));
this.br = br;
this.pw = pw;
this.name = br.readLine();
this.list = list;
this.list.add(this);
}
public void sendMessage(String msg) {
pw.println(msg);
pw.flush();
}
@Override
public void run() {
// broadcast
// ChatThread 는 사용자가 보낸 메시지를 읽어들여서
// 접속된 모든 클라이언트에게 메시지를 보냄
// 나를 제외한 모든 사용자에게 "OO 님이 연결되었습니다." 보내기
// 현재 ChatThread 를 제외하고 보내기
try {
broadcast(name + "님이 연결되었습니다.", false);
String line = null;
while ((line = br.readLine()) != null) {
if ("/quit".equals(line)) {
break;
}
// 나를 포함한 ChatTrhead 에게 메시지 보냄
broadcast(name + " : " + line, true);
}
} catch (Exception e) { // Exception이 발생한건 ChatThread가 연결이 끊어진 결
} finally {
broadcast(name + "님이 연결이 끊어졌습니다.", false);
this.list.remove(this);
try {
br.close();
} catch (Exception e) {
}
try {
pw.close();
} catch (Exception e) {
}
try {
socket.close();
} catch (Exception e) {
} }
}
private void broadcast(String msg, boolean includeMe) {
List<ChatThread> chatThreads = new ArrayList<>();
for (int i = 0; i < this.list.size(); i++) {
chatThreads.add(list.get(i));
}
try {
for (int i = 0; i < chatThreads.size(); i++) {
ChatThread chatThread = chatThreads.get(i);
if (!includeMe) { // 나 자신은 포함하지 않기
if (chatThreads == this) {
continue; // break?
}
}
chatThread.sendMessage(msg);
}
} catch (Exception e) {
e.printStackTrace();
}
}
}
|
# 실습코드 - 클라
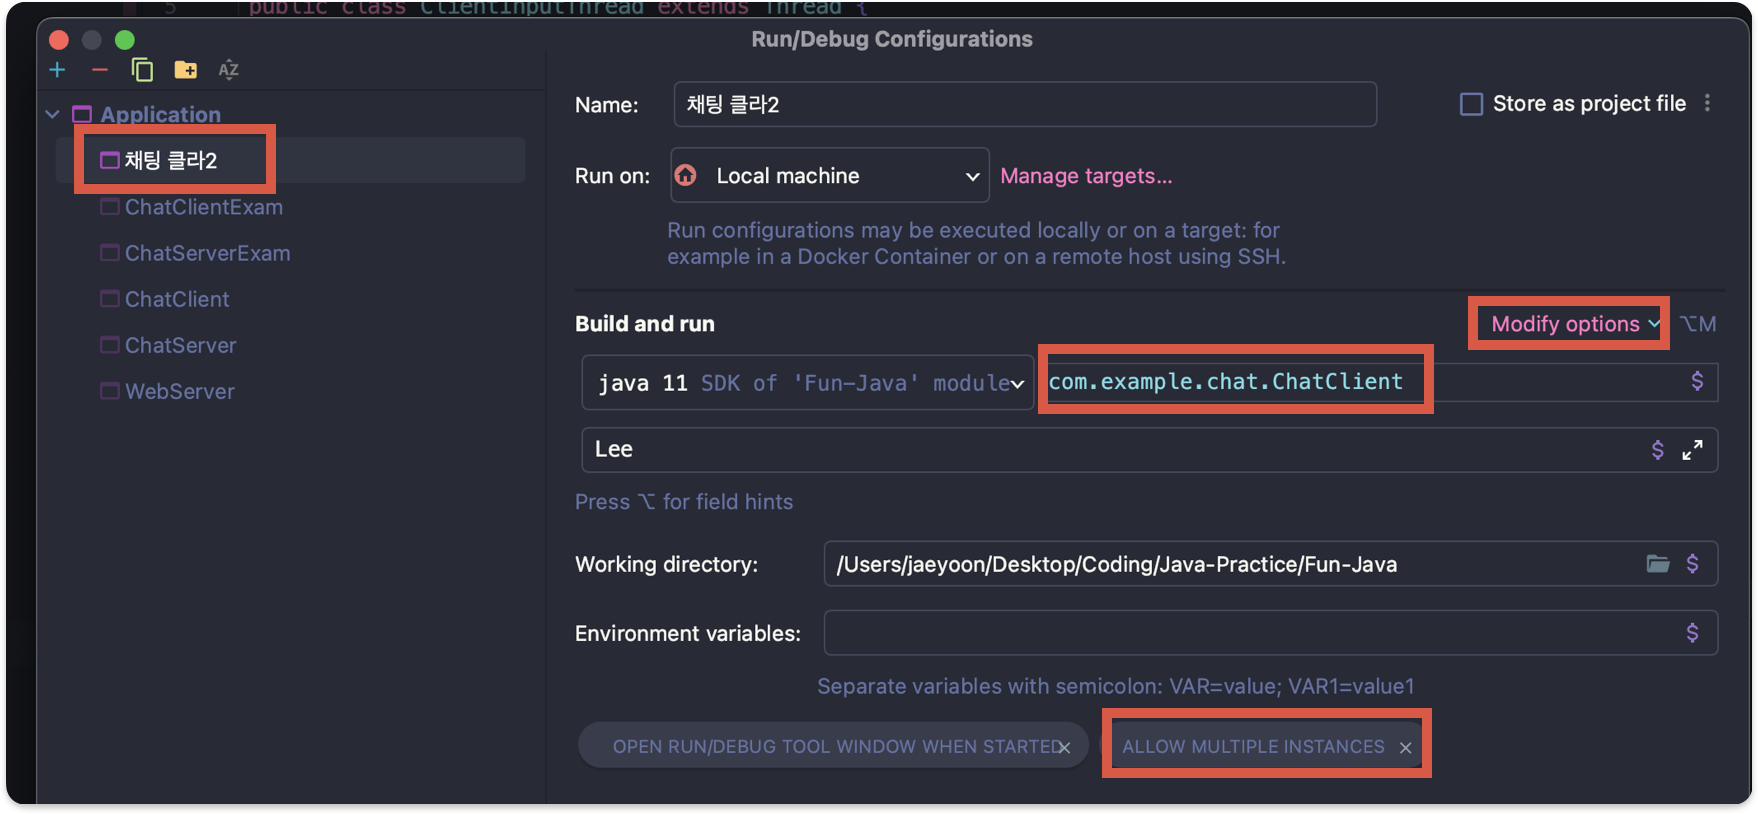
- Application 누르면 Add new configuration 나옴
- 하나 생성하고 돌릴 코드위치 넣어주고
- Modify options에서 ALLOW MULTIPLE INSTANCES 추가하기

- 옆에 점 세개 누르면 바로 args 정할 수 있음
 1
 2
 3
 4
 5
 6
 7
 8
 9
10
11
12
13
14
15
16
17
18
19
20
21
22
23
24
25
26
27
28
29
30
31
32
33
34
35
36
37
38
| public class ChatClient {
public static void main(String[] args) throws Exception {
if (args.length != 1) {
System.out.println("사용법 : 닉네임 설정");
return;
}
String name = args[0];
Socket socket = new Socket("127.0.0.1", 8888);
BufferedReader br = new BufferedReader(new InputStreamReader(socket.getInputStream()));
PrintWriter pw = new PrintWriter(new OutputStreamWriter(socket.getOutputStream()));
BufferedReader keyboard = new BufferedReader(new InputStreamReader(System.in));
// 닉네임 전송
pw.println(name);
pw.flush();
// 백그라운드로 서버가 보내준 메시지를 읽어서 화면에 출력
ClientInputThread clientInputThread = new ClientInputThread(br);
clientInputThread.start();
// 클라이언트트 읽어들인 메시지를 서버에게 전송
try {
String line = null;
while ((line = keyboard.readLine()) != null) {
if ("/quit".equals(line)) {
break;
}
pw.println(line);
pw.flush();
}
} catch (Exception e) {
e.printStackTrace();
} finally {
socket.close();
}
}
}
|
 1
 2
 3
 4
 5
 6
 7
 8
 9
10
11
12
13
14
15
16
17
18
19
| public class ClientInputThread extends Thread {
BufferedReader br;
public ClientInputThread(BufferedReader br) {
this.br = br;
}
@Override
public void run() {
try {
String line = null;
while ((line = br.readLine()) != null) {
System.out.println(line);
}
} catch (Exception e) {
System.out.println("연결이 종료되었습니다.");
}
}
}
|


